2. Loading a project
Once X-SOCS is started, you can either create a New project or open an Existing project.
A project contains the information about a single K-map acquisition (scans and calibration) and stores data reduction results (conversion to QSpace and fit).
New project
To start the project creation wizard, click on the  button in the toolbar or select the Create project item in the File menu.
Create project
The first page will ask you for the folder path into which the new project will be created.
Warning
There can be only one project per folder! A confirmation dialog will pop up if a project file is already present in the chosen directory.
The next page gives you the choice between:
 Load Bliss data (HDF5) to import data in HDF5 format acquired with Bliss.
Select the HDF5 master file of the dataset (the file that contains links to all the scans). Once the project is created, the Project summary page is displayed.
Load X-Socs data (HDF5) to import K-map data already in HDF5 format.
To load data that has already been merged, select the master file of the merged data (the file that contains links to all entries). Once the project is created, the Project summary page is displayed.
Import SPEC data to import K-map data SPEC and EDF files from the ESRF ID01 beamline.
X-SOCS will merge the SPEC file and the EDF images into HDF5 files.
See Merge ID01 SPEC and EDF to HDF5 below.
Merge ID01 SPEC and EDF to HDF5
When using X-SOCS to merge data the following window is displayed:
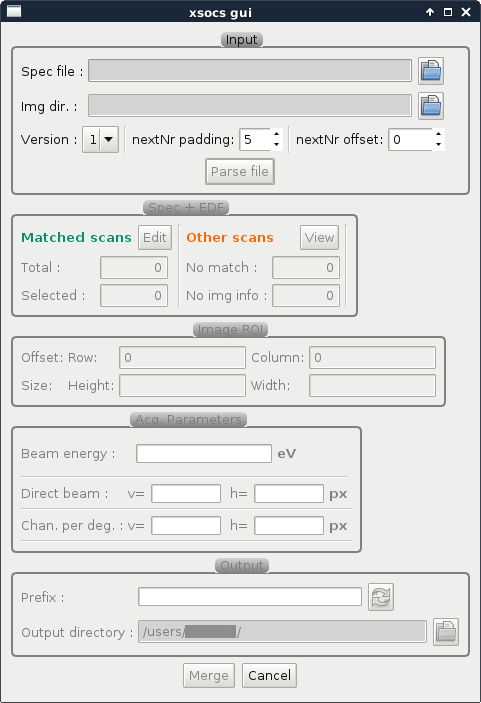
Fig. 2.1 Merge window
Fill the Input Parameters before starting the parsing by clicking on the Parse file button. The time it takes depends on the size of the spec file. It can take more than a minute if the file is very large.
Warning
At the moment X-SOCS merges all scans found in the SPEC file that have a matching EDF file. So you will have to make sure that ONLY the images corresponding to the scans you want to merge are in the Img. dir folder.
Once SPEC parsing is done, the other parameter fields are enabled:
SPEC + EDF Parameters for parsing results and scan/EDF file matching.
Image ROI Parameters for only saving a region of interest from the input images.
Acq. Parameters for calibration information. In case this information is available in the SPEC file, those parameters are already set.
After filling those fields, click on the Merge button at the bottom of the window to start the file conversion.
Note
When the merge starts you should see the progress of some files changing from 0 to 2%, and then not change for a while. This is because the merge process is opening the EDF files to get the number of frames and this can take a while.
Once the conversion to HDF5 is done, the Project summary page is displayed.
Input Parameters
Parameter |
Description |
|---|---|
|
Path to the log (usually a *.spec file) generated by the K-map command. It contains the information of all the scans. |
|
Path to the folder containing the EDF files that must be merged into the HDF5 file. |
|
Allows you to select predefined values for the nextNr padding and offset. For data acquired before March 2016 you will probably want to set the version to 0, otherwise version 1 should be OK. |
|
|
|
Controls the offset applied to the nextNr value. |
SPEC + EDF Parameters
Parameter |
Description |
|---|---|
|
Scans found in the spec file which have a matching EDF file. |
|
Scans found in the spec file which do NOT have a matching EDF file. |
Image ROI Parameters
Parameter |
Description |
|---|---|
|
|
|
|
Acq. Parameters
Parameter |
Description |
|---|---|
|
Energy of the beam, in eV |
|
Position in pixels of the direct beam on the detector |
|
Channels per degree |
Output Parameters
Parameter |
Description |
|---|---|
|
String that will be prepended to all the hdf5 file names. Default is the “prefix” value found in the SPEC file |
|
Folder into which the merged files will be written |
Project summary
Once data has been imported, X-SOCS sums the intensity of all images. This can take quite some time depending on the size of the acquired data.
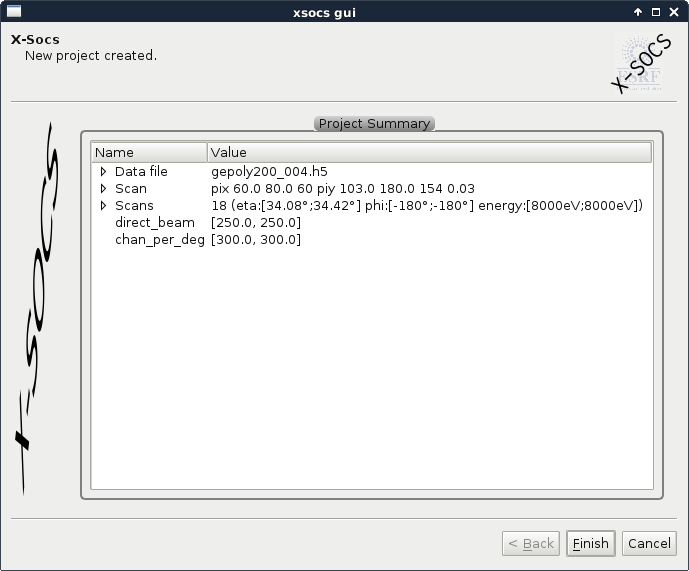
Fig. 2.2 Open project summary page
Finally, the project summary page (Fig. 2.2) provides the description of the scans from which the project has been created. Click on Finish to display the newly created project in the project tree window and the intensity view.
Existing project
To load an existing project click on the ![]() button in the toolbar or select the Open project item in the File menu.
This opens a file dialog which allows you to browse to and select a
button in the toolbar or select the Open project item in the File menu.
This opens a file dialog which allows you to browse to and select a xsocs.prj file.
Once the project file is selected, the project summary page (Fig. 2.2) provides the description of the scans contained in the project.
From there you can either cancel, or click on Finish to load the selected project in the project tree window and the intensity view.